
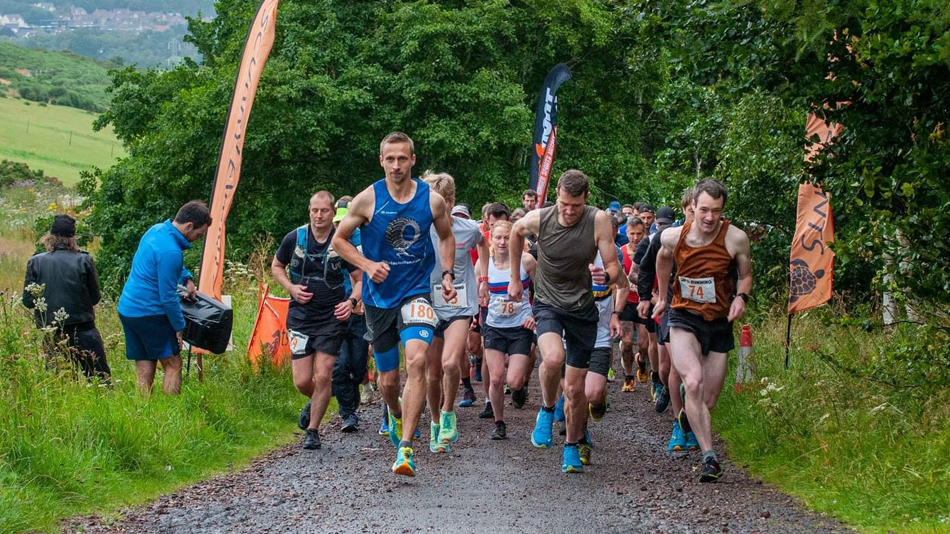
Scurry to the Sea is one of my favourite races. One of the few races I do every year and as well as being a fun event, it also serves as a good barometer of how my fitness has progressed over the past year.
It's quite a unique race in Edinburgh that involves hill running, trail running, road running, some (optional) self-navigation, and a small amount of sand running. I think this variation and freedom to choose and tweak your own route is why I love it so much.
Due to this uniqueness, there are quite a few tips and tricks I've picked up over the years that I'll share below. In particular, I've tweaked my route slightly many times and now I've gotten it to a reasonably optimised place.
Each year I've managed to shave off a decent chunk of time:
- 2020 - 1:32:25 - 28th place
- 2021 - 1:25:02 (-7m 23s) - 8th place
- 2022 - 1:19:27 (-5m 35s) - 5th place
- 2023 - 1:15:56 (-3m 31s) - 5th place
Hopefully some of the things I have learned and detailed below can help any first timers doing this race, or equally those looking to improve their previous time.
A link to my Strava route for the 2023 race is available below. Feel free to download the GPX file from this.
Race Overview
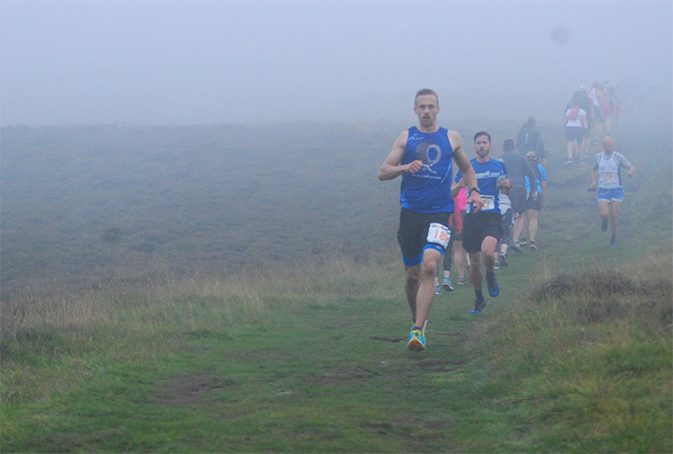
The race starts at Hillend Ski Centre with a very spicy steep climb to the top of Allermuir in the Pentland Hills, with checkpoint 1 situated at the top.
Straight back down the hill, through Swanston making your way to the second checkpoint at the entrance to the Hermitage of Braid nature reserve.
The third checkpoint is then at Kings Haugh entering Peffermill industrial estate. This section between checkpoint 2 and 3 is where there is the most scope for variation in different routes.
Following the cycle path and then Brunstane Path, finally finishing with a short section along the beach at Musselborough.
What Shoes to Wear?
With the variation in terrain and steep hill to navigate at the start, choosing the right shoes to wear can be quite tricky.
I've tried many different types of shoe, and even did an experiment running the same descent from Allermuir 4 times in a row wearing different shoes to see how big a difference it made in terms of absolute time. (The end result of this experiment was less than 30s difference between aggressive trail shoes with maximum grip and slick carbon-plated road racing shoes with very little grip).
The 2km descent down from the top of Allermuir can be a little sketchy if it's wet or muddy, but this is this only part of the race where proper trail shoes would help.
After many trials and experiments, my advice would be to prioritise the road running. At the end of the day, the hill and trails at the start is only about 20% (4km) of the race, the remaining 80% (14km) is mostly on tarmac. Running 14km with aggressive trail shoes on would not be a pleasant experience.
So basically go with the most "road-running-type" shoes you feel you get away with for the hills and trails at the start. Obviously this will vary a bit depending on your experience/downhill running ability/weather conditions on the day.
If you're not an experienced runner, not confident on the downhills, or not overly bothered about running your fastest time, then maybe lean a bit more towards a jack of all trades shoe, e.g. Hoka Speedgoat.
In general -
- Shoe for most sensible/most comfortable experience = A hybrid-style jack of all trades shoe, something with some tread/grip but still comfort for road running, e.g. Hoka Challenger/Speedgoat, Inov-8 Trailfly.
- Shoe for your absolute fastest possible time = The fastest road running shoe you feel you personally can get away with for the hill at the start, e.g. a "supershoe" with some kind of grip (Hoka Rocket X2, Puma Deviate Nitro 2, Saucony Endorphin Pro 2). I went with Hoka Rocket X2 for my previous and fastest attempt.
(I've seen a couple people actually have multiple shoes with them for the race, and change after the hill section. I don't think the overhead of carrying them with you and the time it takes to change them can be offset by any gain in performance. So I don't think this idea is worth it at all)
The Route (Where to Save Time)
One thing to note is that the self-navigation aspect of the race is sort of optional. If you don't have any interest in shaving off time or optimising your route, then it's perfectly fine to follow the suggested route. There are intermittent course markings along the suggested route (some signs, some orange tape around lampposts etc).
However, the marked route (particularly between checkpoints 2 and 3) is not the fastest or shortest, so continue reading below on where you can save quite a bit of time.
1. Start line to top of Allermuir
The first 2kms are all uphill to the top of Allermuir Hill. There is really one route here so not much to think about in terms of navigation.
It's a very steep spicy start so don't kill yourself too early. The first few runners will likely take about 12-14mins to get to the top, and the average time probably closer to 20-25mins. A decent amount of time going purely uphill in any case.
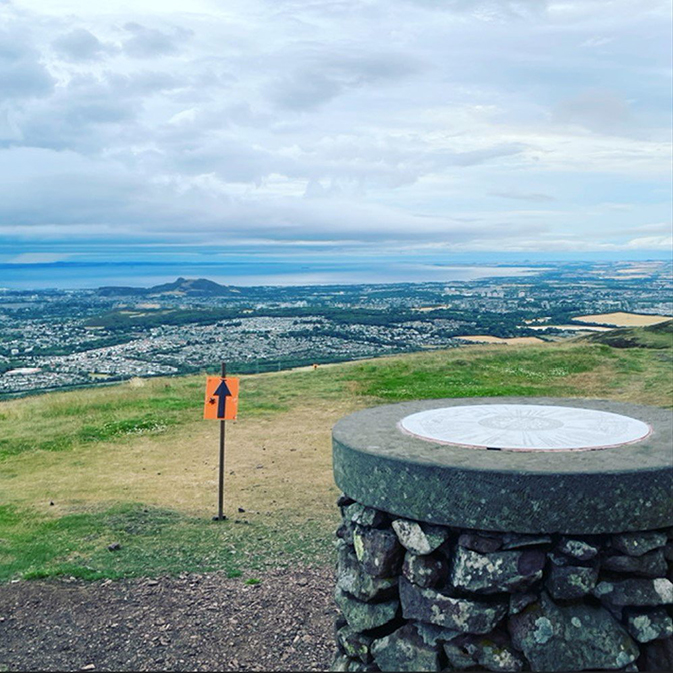
View from the first checkpoint at the top of Allermuir.
2. Back down the hill towards Swanston.
After running around the trig point (checkpoint 1), it's another 2km straight back down the hill. This is the only part that might be a bit sketchy running-wise if you've got road trainers on and/or the weather hasn't been kind.
Again no navigation choices to be made here, though there are a few subtly different lines you can take down the hill. It's worth have a recce of this downhill in advance if you can, just to get an idea where any potentially slippy or steep parts are.
When you get to the junction at the bottom of Allermuir you'll head left down towards Swanston Golf Club (the other direction would be back towards the start line). Don't worry about this, there will be a marshall there directing everyone.
There is a short particularly stony/gravelly section, through a couple gates and then down to through Swanston car park. Every year I've seen a couple people go slightly the wrong way during this part.
The path down to through the golf course naturally curves right around the village/farm. You don't actually want to follow this all the way round. Instead take the path through the woods, into the village, across the small bridge and into the car park.
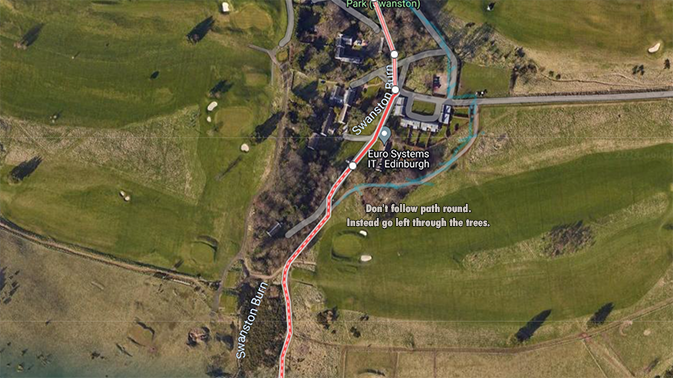
Go left into the trees and down to the car park.
If you do accidentally go the wrong way here, it's not a massive detour by any means, just a little unnecessary distance.
3. Swanston to Braidburn Valley
From Swanston Golf Club, it's a long straight road slightly uphill over the bypass and up to Oxgangs Rd. Straight over at the junction into the housing scheme and run down to the T-junction. The entrance to the cycle path you want is just to the left.
No decisions at this point, it's the way everyone goes and should be marked with the orange tape/signs.
You'll follow this cycle path for about 1km before the entrance to Braidburn Valley. Right at the end of this part it can be slightly confusing depending on whether the orange tape is there or not. You want to head left to the road at Oxgangs Ave, then immediately turn back on yourself to get into Braidburn Valley.
4. Braidburn Valley to Checkpoint 2
This is the first time we'll diverge slightly from the suggested route. When you come into the valley the course markings will likely tell you to head left. Instead, cross over the bridge to the other side of the burn and head left along the path on the other side.
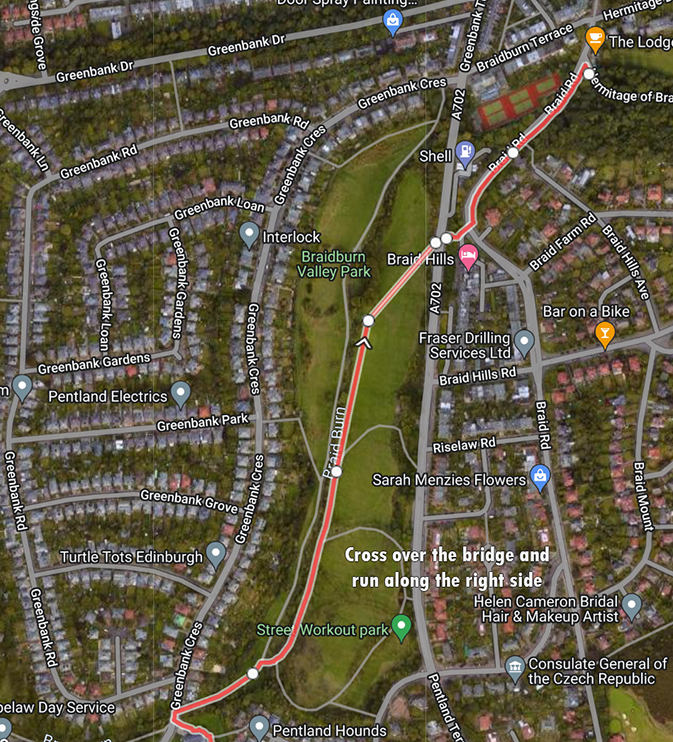
Cross over the bridge, run up the grass hill, up the steps before the Shell Garage.
Continue along the path, then cut on to the grass just as the path starts to turn away from the burn. Head up the grass hill in a straight line towards the opening/gate in the fence. When you get up to the road you should hopefully see the Shell garage on the other side of the road to your left.
Be careful crossing this road (can be quite busy and with fast moving cars). You're aiming for the small steps on the other side of road, towards the shell garage but a short distance (50m) before you get to it.
After getting to the top of the steps, head left down the road and follow curve round. You should then get to the entrance of Hermitage of Braid where the 2nd checkpoint is.
5. Checkpoint 2 to Checkpoint 3
This is where the biggest diversion [from the suggested route] and time saving comes in. The suggested route is a nice scenic run through the Hermitage, Double Hedges Road, and around Craigmiller Castle Park. It's arguably a nicer/more enjoyable route, but it's by no means the quickest or shortest path between the two checkpoints.
Instead, if you're after a faster time, then here is an alternative that should save you a good 3-5mins depending on your pace. This alternative route is 4.6km (25m elevation gain) compared to 5.5km (28m elevation gain) for the suggested waymarked route. So 0.9km shorter and with marginally less elevation as well.
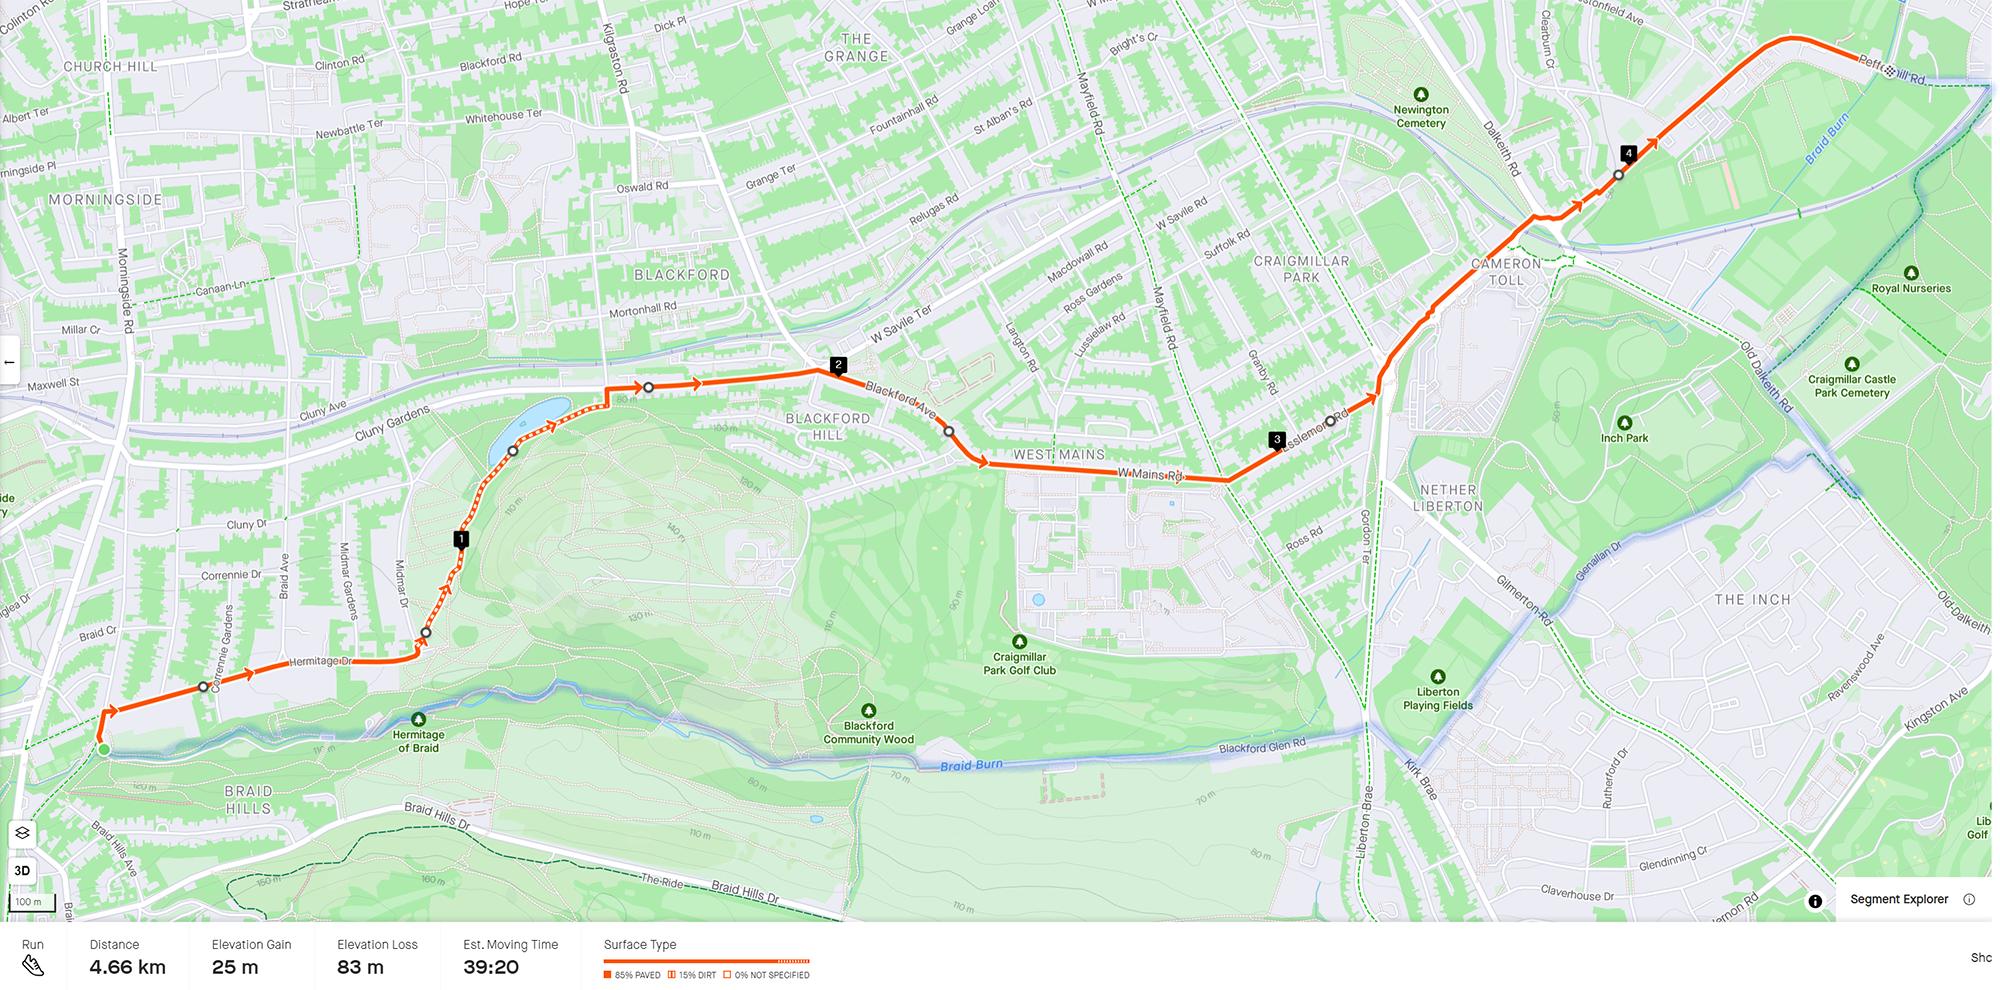
The quicker alternative route (red) compared to suggested/longer route (light blue)
As soon as you've checked in (shouted out your race number) at checkpoint 2, immediately turn around and head back up to the road away from the Hermitage. Take a right on to Hermitage Drive and follow this straight all the way until the bend.
At this point you want to cut over onto the grass and follow the trail downhill towards Blackford Pond. Essentially we're taking a shortcut down the grass hill, on to the main path that goes past Blackford Pond, eventually coming out the main gate into Blackford.
Take a right out of the gate along Charterhall Rd, continuing straight/right at the junction on to Blackford Ave and West Mains Rd.
The aim for the next part is basically to straight line it as much possible down to the big roundabout at Cameron Toll, taking extra care when crossing any roads. (This is the one potential drawback of this route - more road crossings where you could get held up at traffic lights. Though I've never had much of an issue with it all the times I've went this way.)
Take the 2nd left (straight) on to Peffermill Road after Cameron Toll roundabout. Follow this road for a bit as it curves round, and the 3rd checkpoint (King's Haugh) will be on your left. Peffermill Road is pretty wide and the curve goes on for a while, so traffic permitting you could take a more "racing line" by crossing over to the right side, then back to the left after the curve. (That's maybe getting a bit ridiculous but every seconds counts haha).
6. Checkpoint 3 to Milton Link
We now re-join the main suggested way-marked route again, and it's just a case of following the Innocent Cycle Path for a while.
One thing to note here is that you don't need to stick exactly to the tarmac path. There are a couple open areas with big grassy fields and the path weaves all over the place. Can save a bit of time by just running in as straight a line as possible over the grass. Spot where the path goes up ahead, and just run in a straight line to that point. (Only caveat to this if it's really wet and muddy of course).
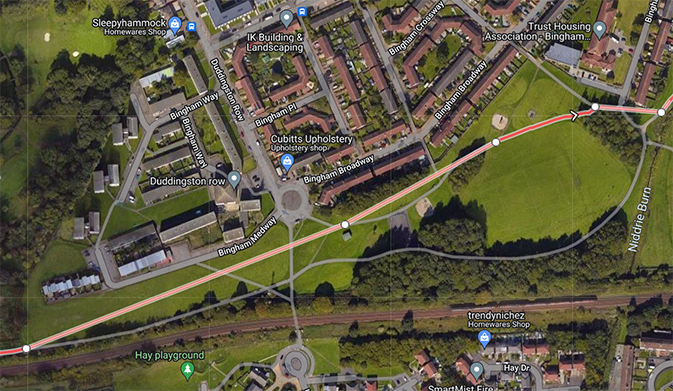
Feel free to run in a straight line across the grass where appropriate. Don't need to stick to winding path.
7. Milton Link to Brunstane Burn Walkway
Eventually you'll get to Milton Link and the car park for "The Range" (formerly "Big W"). On the other side of the car park is a footbridge over the railway.
It's easy to go the wrong way here after crossing the bridge. After crossing the bridge you want to go left first very slightly, followed by a right down Brunstane Road S. (Don't go straight ahead/right after the bridge like I did one year!)
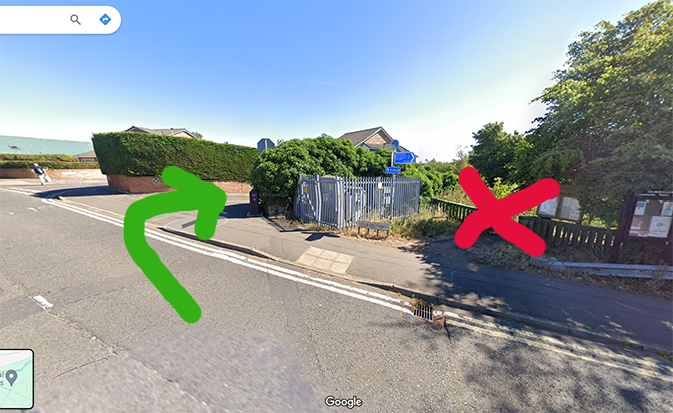
After the bridge, head left first slightly and then down the first road. Don't go straight.
You won't be on Brunstane Road S very long at all before taking a narrow path on the left down on to the Brunstane Burn Walkway, which is easy to miss.
This whole section immediately after the bridge is a bit awkward navigation-wise, particularly when running at speed. So definitely worth a wee recce of this part if you can. Also keep an eye out for the orange tape way-marking on the day.
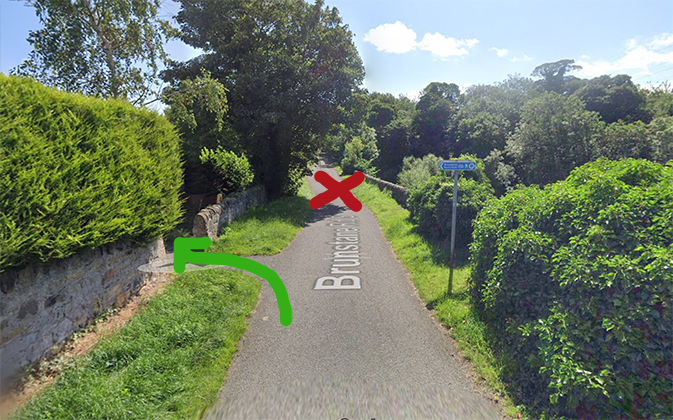
Keep your eye out for the small opening to get on to Brunstane Burn Walkway
8. Brunstane Burn Walkway
We're not too far from the finish line now. This section is basically following the Brunstane Burn Walkway all the way to the end where it joins on to Edinburgh Rd.
There are a couple minor junctions to navigate but hopefully should be fairly obvious which way to go. At the first junction you want to head through the tunnel that goes under the railway. At the second meaningful junction, you want to head straight/slight right. Keep an eye out for the orange tape and should be fine.
9. To the Finish Line
When you come up on to Edinburgh Rd you want to head right and run along the road for a bit. There is usually a marshall here directing so don't worry too much about this part. You'll then take a left at the first proper road/path towards the beach.
The beach serves as the finishing straight, about 500m along the sand to the finish line. One tip for this part is to head down to the wet sand and run along there as far as possible. Running on wet firm sand is so much easier and quicker than the deep soft stuff.
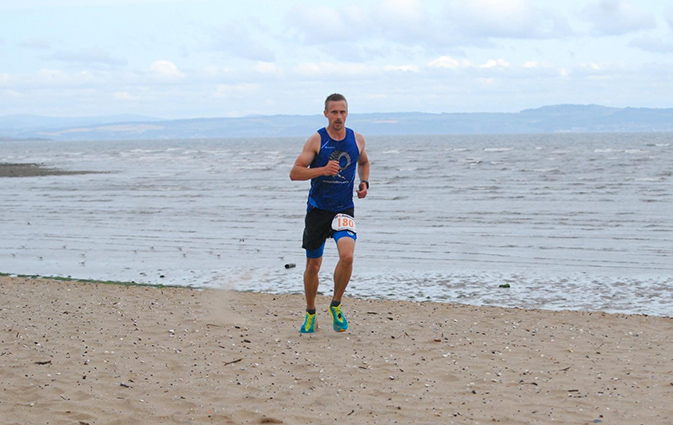
Run along the wet sand close to the sea instead of the deep soft sand.
Only coming back up to the soft sand right at the very end, and to cross the finish line for a well earned rest.
Summary
Scurry to the Sea is a brilliant race and I highly recommend it, especially if you live in or near Edinburgh. Hopefully the above tips and route help someone get a slightly faster time (if that's what you're aiming for!).
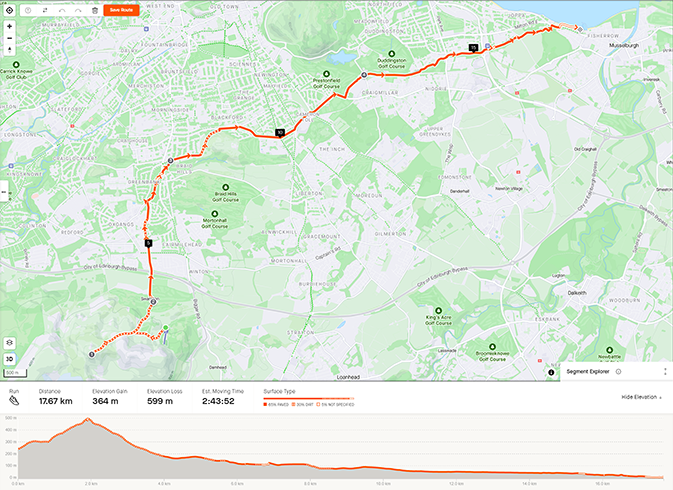
The full route and elevation map